
If you saw my Instagram post yesterday, I stepped out of my comfort zone early this week to do a DIY. I don’t necessarily consider myself a lifestyle blogger or whatever, but I wanted to do this DIY to make this an awesome deal. (Plus if I failed I never had to write about it or tell anyone, ha!) I recently was scrolling through Anthropologie’s new arrivals (a few weeks back) and found this tee: 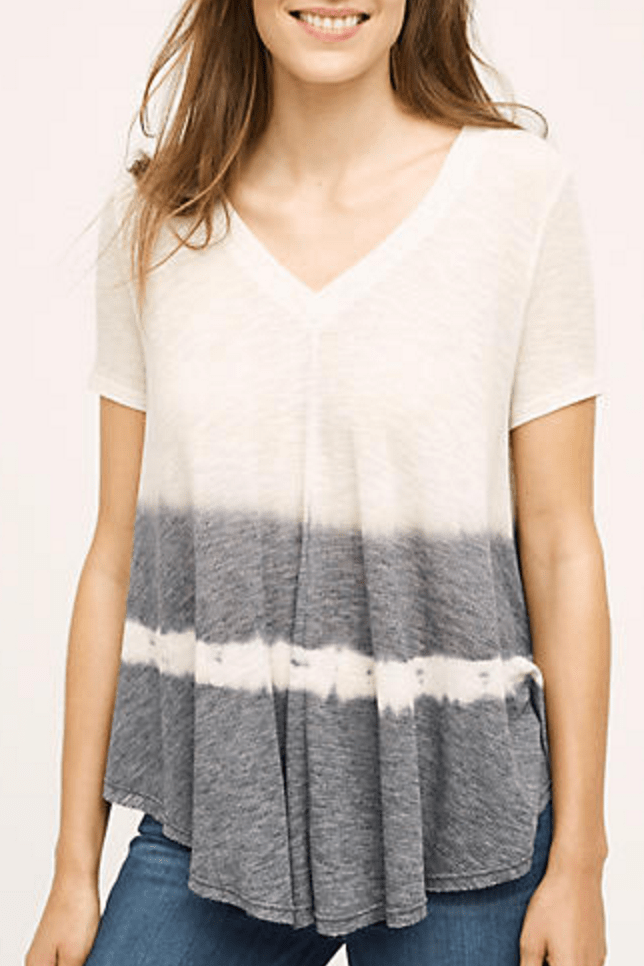
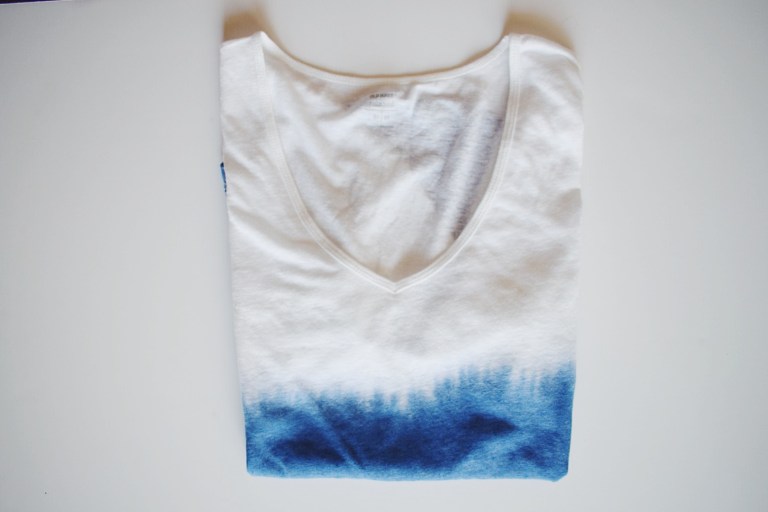
I gave myself a challenge: I figured I could make one similar to this. Surprisingly, I did it! Keep in mind that every dye job will turn out a little different. Maybe borrow your boyfriend or husband’s cotton undershirt or use an old white tee for practicing beforehand if you’re nervous. I just went for it, realizing I could turn the whole thing into a ombre tee if I wanted.

What you’ll need:

1 T-Shirt (Mine is this one, I sized up for an oversized look.)
1 Pack Tulip Fabric Dye (Color of your choice, I chose Royal Blue)
1 Small Bucket or Large Mixing Bowl
1 Gallon Steaming Hot Water
1 Mixing Spoon
1 Pair Disposable or Reusable Gloves (I used reusable)
4 tablespoons Salt
Plastic Bags
Directions: 
- After gathering your supplies, start by boiling your water. If you have a tea kettle, I would suggest using that. It makes it really easy to get the temperature of water quickly. If not, a pot would probably work well! While water is boiling, lay out plastic bags or garbage bag to size on a flat surface.
- When the water is steaming, or boiling, pour it into your bowl or bucket. Quickly pour 3/4 of the dye packet into the bowl. I found that it wasn’t necessary to use all of the water or all of the dye packet for this small of a dye job. If you would like the color more saturated, simply add more dye to your mixture!
- Next, add salt. I am kind of silly and only have the salt grinders. My father-in-law says that salt grinders aren’t even real because you can’t grind salt down like you can peppercorns, which is true. Anyway, I just put as much as I could in there. It says 4 tablespoons of salt. It dissolves quickly into the hot water. Stir.
- Next, you have to pin the bottom of the shirt to the top. This was probably the most tricky step for me to understand. CJ (my husband) and I often have many discussions about design principles that I want to execute. I come up with weird things I want to do, he helps me figure out how to do it. This helps in my sewing endeavors as well! –He had to explain this to me a bunch of times, so I’m hoping the pictures will help! This step makes it possible for the white line to show on the shirt, otherwise it would be completely blue from bottom to top. Carefully fold and pin where you would like you first blue block to begin and end. This will be the block closest to your bust line.


- After placing gloves on, dip the pinned section ONLY in the dye. Making sure you dip below your pins. I first pinned down where it is shown in pictures to get a smooth line, I then moved the pins up and pinned all the way through the layers. (A note that I wish I would have known: Remember that your fabric is doubled now from being folded. You don’t have to dip very much! My section ended up larger than I thought).
- If you are happy with the result and edges look even, squeeze extra dye out of shirt into bowl. Lay t-shirt to flat dry on plastic bags. (Mine weren’t perfect, but I liked it! You can also use your stirring spoon to pour a little on uneven edges.)
- When t-shirt is damp, unpin first section, you can now decide if you want only one block or a second block. Make sure you leave about 1-3 inches of white space for the white stripe for the design of this t-shirt in between blocks of color. If you want a second block, fold t-shirt in half (long way or ‘hot dog’ style) for easy, symmetrical result. Dye until desired color is met.
- Repeat step 6.
- Next, we wait wait wait wait! The instructions online told me to wait 6-8 hours before rinsing out dye for best results. I actually left mine over night. Then, I carefully dipped it back in a cold/water vinegar mixture which is supposed to help it keep color through washing.

- Wash alone in cold water, delicate cycle.

That’s all, haha. Whew! Longest blog post ever. Hey hey hey! I’ve got some great deals for you today. If you made it through all those instructions, you are rewarded. 🙂 You know my Old Navy tee that I made this post with? Every thing at Old Navy is 40% off with no exclusions today. Hip hip hooooooray. Also, Anthropologie is having an extra 25% off all sale items-no code necessary. (In case you didn’t want to make this tee, go find your own dip dye tee!)
Enjoy your new tee and these directions! I’m definitely going to side-knot mine with high-waisted skinnies. I can’t wait to see how you style yours. Let me know what your creations turn out like by using #HLSSdipdye
happy dye shopping,
Cortney

I love your version, the blue is so cute!! I’m so impressed by how it turned out! I haven’t tie dyed anything since a birthday party in ninth grade, maybe I’ll have to try my hand at it again:)
LikeLike
Thank you so much! It’s definitely so so easy. I love how it turned out as well that salt and vinegar rinse are crucial to making the dye stick. Glad you enjoyed this post!
LikeLike